Understanding layouts is important for good Android application design. In this tutorial, you learn all about table layouts, which organize user interface controls, or widgets, on the screen in neatly defined rows and columns. When used correctly, table layouts can be the powerful layout paradigm upon which Android applications can design their screens or display tabular data.
What Is A Table Layout?
A table layout is exactly what you might expect: a grid of made up of rows and columns, where a cell can display a view control. From a user interface design perspective, a TableLayout is comprised of TableRow controls—one for each row in your table. The contents of a TableRow are simply the view controls that will go in each “cell” of the table grid.The appearance of a TableLayout is governed by several additional rules. First, the number of columns of the entire table matches the number of columns in the row with the most columns. Second, the width of each column is defined as the width of the widest content in the column. The TableLayout’s child rows and cells layout_width attributes are always MATCH_PARENT — although they can be put in an XML file, the actual value can’t be overridden. The TableLayout’s layout_height of a cell can be defined, but a TableRow attribute for layout_height is always WRAP_CONTENT. Cells can span columns, but not rows. This is done through the layout_span attribute of the child view of a TableRow. A cell is a single child view within a TableRow. If you want a more complex cell with multiple views, use a layout view to encapsulate the other views.
That said, some rules can be modified. Columns can be marked as stretchable, which means that the width can expand to the size of the parent container. Columns can also be marked as shrinkable, which means that they can be reduced in width so the whole row will fit in the space provided by the parent container. You can also collapse an entire column.
For the complete documention for table layouts, see the Android SDK documentation for the TableLayout class. The associated XML attributes for use in XML resources are also defined in the documentation.
Designing a Simple Table Layout
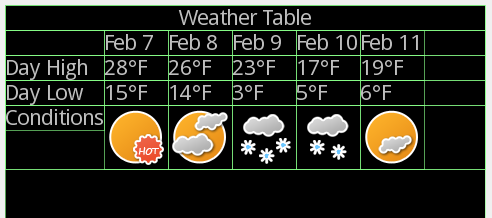
Layouts are best explained by example, and table layouts are no different. Let’s say we want to design a screen that shows the extended weather forecast. A table layout might be a good choice for organizing this information:- In the first TableRow, we can display a title for the screen.
- In the second TableRow, we can display the dates in a familiar calendar-like format.
- In the third TableRow, we can display a Daily High temperature information.
- In the fourth TableRow, we can display a Daily Low temperature information.
- In the fifth TableRow, we can display graphics to identify the weather conditions, such as rain, snow, sun, or cloudy with a chance of meatballs.
Defining an XML Layout Resource with a Table Layout
The most convenient and maintainable way to design application user interfaces is by creating XML layout resources. This method greatly simplifies the UI design process, moving much of the static creation and layout of user interface controls and definition of control attributes, to the XML, instead of littering the code.XML layout resources must be stored in the /res/layout project directory hierarchy. Let’s take a look at the table layout introduced in the previous section. This layout resource file, aptly named /res/layout/table.xml, is defined in XML as follows:
- <?xml version="1.0" encoding="utf-8"?>
- <TableLayout
- xmlns:android="http://schemas.android.com/apk/res/android"
- android:id="@+id/tableLayout1"
- android:layout_width="match_parent"
- android:layout_height="match_parent"
- android:shrinkColumns="*"
- android:stretchColumns="*">
- <TableRow
- android:id="@+id/tableRow4"
- android:layout_height="wrap_content"
- android:layout_width="match_parent"
- android:gravity="center_horizontal">
- <TextView
- android:id="@+id/textView9"
- android:layout_width="match_parent"
- android:layout_height="wrap_content"
- android:textStyle="bold"
- android:typeface="serif"
- android:textSize="18dp"
- android:text="Weather Table"
- android:gravity="center"
- android:layout_span="6"></TextView>
- </TableRow>
- <TableRow
- android:id="@+id/tableRow1"
- android:layout_height="wrap_content"
- android:layout_width="match_parent">
- <TextView
- android:id="@+id/TextView04"
- android:text=""></TextView>
- <TextView
- android:id="@+id/TextView04"
- android:text="Feb 7"
- android:textStyle="bold"
- android:typeface="serif"></TextView>
- <TextView
- android:id="@+id/TextView03"
- android:text="Feb 8"
- android:textStyle="bold"
- android:typeface="serif"></TextView>
- <TextView
- android:id="@+id/TextView02"
- android:text="Feb 9"
- android:textStyle="bold"
- android:typeface="serif"></TextView>
- <TextView
- android:id="@+id/TextView01"
- android:text="Feb 10"
- android:textStyle="bold"
- android:typeface="serif"></TextView>
- <TextView
- android:text="Feb 11"
- android:id="@+id/textView1"
- android:textStyle="bold"
- android:typeface="serif"></TextView>
- </TableRow>
- <TableRow
- android:layout_height="wrap_content"
- android:id="@+id/tableRow2"
- android:layout_width="match_parent">
- <TextView
- android:text="Day High"
- android:id="@+id/textView2"
- android:textStyle="bold"></TextView>
- <TextView
- android:id="@+id/textView3"
- android:text="28°F"
- android:gravity="center_horizontal"></TextView>
- <TextView
- android:text="26°F"
- android:id="@+id/textView4"
- android:gravity="center_horizontal"></TextView>
- <TextView
- android:text="23°F"
- android:id="@+id/textView5"
- android:gravity="center_horizontal"></TextView>
- <TextView
- android:text="17°F"
- android:id="@+id/textView6"
- android:gravity="center_horizontal"></TextView>
- <TextView
- android:text="19°F"
- android:id="@+id/textView7"
- android:gravity="center_horizontal"></TextView>
- </TableRow>
- <TableRow
- android:layout_height="wrap_content"
- android:id="@+id/tableRow2"
- android:layout_width="match_parent">
- <TextView
- android:text="Day Low"
- android:id="@+id/textView2"
- android:textStyle="bold"></TextView>
- <TextView
- android:text="15°F"
- android:id="@+id/textView3"
- android:gravity="center_horizontal"></TextView>
- <TextView
- android:text="14°F"
- android:id="@+id/textView4"
- android:gravity="center_horizontal"></TextView>
- <TextView
- android:text="3°F"
- android:id="@+id/textView5"
- android:gravity="center_horizontal"></TextView>
- <TextView
- android:text="5°F"
- android:id="@+id/textView6"
- android:gravity="center_horizontal"></TextView>
- <TextView
- android:text="6°F"
- android:id="@+id/textView7"
- android:gravity="center_horizontal"></TextView>
- </TableRow>
- <TableRow
- android:id="@+id/tableRow3"
- android:layout_height="wrap_content"
- android:layout_width="match_parent"
- android:gravity="center">
- <TextView
- android:id="@+id/textView8"
- android:text="Conditions"
- android:textStyle="bold"></TextView>
- <ImageView
- android:id="@+id/imageView1"
- android:src="@drawable/hot"></ImageView>
- <ImageView
- android:id="@+id/imageView2"
- android:src="@drawable/pt_cloud"></ImageView>
- <ImageView
- android:id="@+id/imageView3"
- android:src="@drawable/snow"></ImageView>
- <ImageView
- android:id="@+id/imageView4"
- android:src="@drawable/lt_snow"></ImageView>
- <ImageView
- android:id="@+id/imageView5"
- android:src="@drawable/pt_sun"></ImageView>
- </TableRow>
- </TableLayout>
- setContentView(R.layout.table);
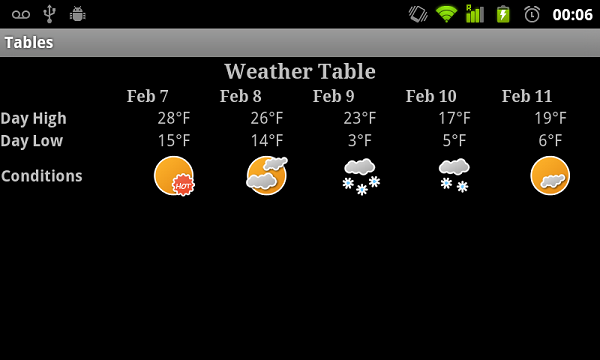
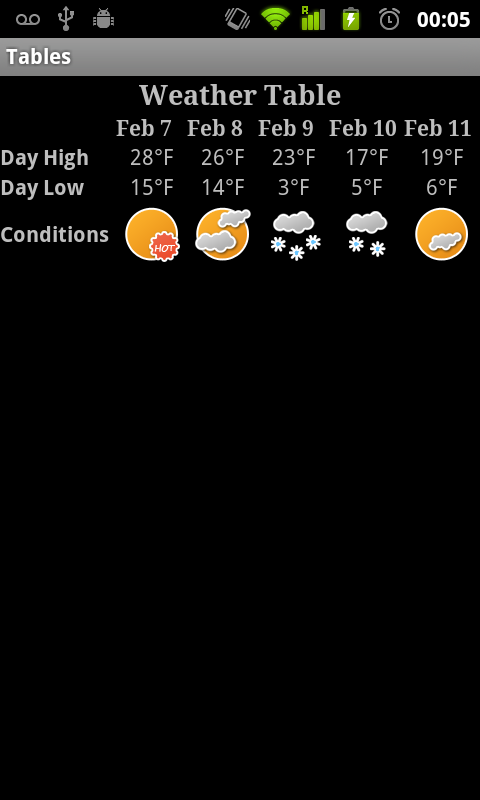
The table now looks like the following to screenshots when in portrait and landscape mode.
Defining a Table Layout Programmatically
You can also programmatically create and configure table layouts in Java. This is done using the TableLayout and TableRow classes (android.widget.TableLayout and android.widget.TableRow). You’ll find the unique display parameters for each control in the TableLayout.LayoutParams and TableRow.LayoutParams classes. Also, the typical layout parameters (android.view.ViewGroup.LayoutParams), such as layout_height and layout_width, as well as margin parameters (ViewGroup.MarginLayoutParams), still apply to TableLayout and TableRow objects, but not necessarily table cells. For table cells (any View inside the TableRow), the width is always MATCH_PARENT. The height can be defined, but defaults to WRAP_CONTENT and need not be specified.Instead of loading a layout resource directly using the setContentView() method as shown earlier, if you create a layout programmatically, you must instead build up the screen contents in Java and then supply a parent layout object which contains all the control contents to display as child views to the setContentView() method. In this case, your parent layout used would be the table layout created.
For example, the following code illustrates how to programmatically have an Activity instantiate a TableLayout layout parameters and reproduce the example shown earlier in XML:
- @Override
- public void onCreate(Bundle savedInstanceState) {
- super.onCreate(savedInstanceState);
- TableLayout table = new TableLayout(this);
- table.setStretchAllColumns(true);
- table.setShrinkAllColumns(true);
- TableRow rowTitle = new TableRow(this);
- rowTitle.setGravity(Gravity.CENTER_HORIZONTAL);
- TableRow rowDayLabels = new TableRow(this);
- TableRow rowHighs = new TableRow(this);
- TableRow rowLows = new TableRow(this);
- TableRow rowConditions = new TableRow(this);
- rowConditions.setGravity(Gravity.CENTER);
- TextView empty = new TextView(this);
- // title column/row
- TextView title = new TextView(this);
- title.setText("Java Weather Table");
- title.setTextSize(TypedValue.COMPLEX_UNIT_DIP, 18);
- title.setGravity(Gravity.CENTER);
- title.setTypeface(Typeface.SERIF, Typeface.BOLD);
- TableRow.LayoutParams params = new TableRow.LayoutParams();
- params.span = 6;
- rowTitle.addView(title, params);
- // labels column
- TextView highsLabel = new TextView(this);
- highsLabel.setText("Day High");
- highsLabel.setTypeface(Typeface.DEFAULT_BOLD);
- TextView lowsLabel = new TextView(this);
- lowsLabel.setText("Day Low");
- lowsLabel.setTypeface(Typeface.DEFAULT_BOLD);
- TextView conditionsLabel = new TextView(this);
- conditionsLabel.setText("Conditions");
- conditionsLabel.setTypeface(Typeface.DEFAULT_BOLD);
- rowDayLabels.addView(empty);
- rowHighs.addView(highsLabel);
- rowLows.addView(lowsLabel);
- rowConditions.addView(conditionsLabel);
- // day 1 column
- TextView day1Label = new TextView(this);
- day1Label.setText("Feb 7");
- day1Label.setTypeface(Typeface.SERIF, Typeface.BOLD);
- TextView day1High = new TextView(this);
- day1High.setText("28°F");
- day1High.setGravity(Gravity.CENTER_HORIZONTAL);
- TextView day1Low = new TextView(this);
- day1Low.setText("15°F");
- day1Low.setGravity(Gravity.CENTER_HORIZONTAL);
- ImageView day1Conditions = new ImageView(this);
- day1Conditions.setImageResource(R.drawable.hot);
- rowDayLabels.addView(day1Label);
- rowHighs.addView(day1High);
- rowLows.addView(day1Low);
- rowConditions.addView(day1Conditions);
- // day2 column
- TextView day2Label = new TextView(this);
- day2Label.setText("Feb 8");
- day2Label.setTypeface(Typeface.SERIF, Typeface.BOLD);
- TextView day2High = new TextView(this);
- day2High.setText("26°F");
- day2High.setGravity(Gravity.CENTER_HORIZONTAL);
- TextView day2Low = new TextView(this);
- day2Low.setText("14°F");
- day2Low.setGravity(Gravity.CENTER_HORIZONTAL);
- ImageView day2Conditions = new ImageView(this);
- day2Conditions.setImageResource(R.drawable.pt_cloud);
- rowDayLabels.addView(day2Label);
- rowHighs.addView(day2High);
- rowLows.addView(day2Low);
- rowConditions.addView(day2Conditions);
- // day3 column
- TextView day3Label = new TextView(this);
- day3Label.setText("Feb 9");
- day3Label.setTypeface(Typeface.SERIF, Typeface.BOLD);
- TextView day3High = new TextView(this);
- day3High.setText("23°F");
- day3High.setGravity(Gravity.CENTER_HORIZONTAL);
- TextView day3Low = new TextView(this);
- day3Low.setText("3°F");
- day3Low.setGravity(Gravity.CENTER_HORIZONTAL);
- ImageView day3Conditions = new ImageView(this);
- day3Conditions.setImageResource(R.drawable.snow);
- rowDayLabels.addView(day3Label);
- rowHighs.addView(day3High);
- rowLows.addView(day3Low);
- rowConditions.addView(day3Conditions);
- // day4 column
- TextView day4Label = new TextView(this);
- day4Label.setText("Feb 10");
- day4Label.setTypeface(Typeface.SERIF, Typeface.BOLD);
- TextView day4High = new TextView(this);
- day4High.setText("17°F");
- day4High.setGravity(Gravity.CENTER_HORIZONTAL);
- TextView day4Low = new TextView(this);
- day4Low.setText("5°F");
- day4Low.setGravity(Gravity.CENTER_HORIZONTAL);
- ImageView day4Conditions = new ImageView(this);
- day4Conditions.setImageResource(R.drawable.lt_snow);
- rowDayLabels.addView(day4Label);
- rowHighs.addView(day4High);
- rowLows.addView(day4Low);
- rowConditions.addView(day4Conditions);
- // day5 column
- TextView day5Label = new TextView(this);
- day5Label.setText("Feb 11");
- day5Label.setTypeface(Typeface.SERIF, Typeface.BOLD);
- TextView day5High = new TextView(this);
- day5High.setText("19°F");
- day5High.setGravity(Gravity.CENTER_HORIZONTAL);
- TextView day5Low = new TextView(this);
- day5Low.setText("6°F");
- day5Low.setGravity(Gravity.CENTER_HORIZONTAL);
- ImageView day5Conditions = new ImageView(this);
- day5Conditions.setImageResource(R.drawable.pt_sun);
- rowDayLabels.addView(day5Label);
- rowHighs.addView(day5High);
- rowLows.addView(day5Low);
- rowConditions.addView(day5Conditions);
- table.addView(rowTitle);
- table.addView(rowDayLabels);
- table.addView(rowHighs);
- table.addView(rowLows);
- table.addView(rowConditions);
- setContentView(table);
- }
As you can see, the code can rapidly grow in size as more controls are added to the screen. For organization and maintainability, defining and using layouts programmatically is best left for the odd case rather than the norm. Additionally, in a case like this, the data would typically be coming from some other source than strings we type in, so a loop may be more appropriate for many applications.
The results are shown in the following figure. As you can see, they are the same as the previous results — as expected.

TableLayout Concerns
Although table layouts can be used to design entire user interfaces, they usually aren’t the best tool for doing so, as they are derived from LinearLayout and not the most efficient of layout controls. If you think about it, a TableLayout is little more than an organized set of nested LinearLayouts, and nesting layouts too deeply is generally discouraged for performance concerns. However, for data that is already in a format suitable for a table, such as spreadsheet data, table layout may be a reasonable choice.Also, table layout data may vary based upon screen sizes and resolutions. It’s generally a good design practice to ensure you enable scrolling when displaying large quantities of data. For example, if the weather example used earlier also included a “write-up” of the conditions, this text might be one sentence or twenty sentences, so enabling vertical and/or horizontal scrolling would be prudent.
No comments:
Post a Comment